MCP Apps 接入指南
让 MCP 工具不再只回纯文本,而是直接在对话里渲染一个可交互的 Widget——按钮、表单、地图、PDF、3D 场景,都能内嵌进 CodeBuddy 的 Web 界面。
本文档面向第三方 MCP server 开发者。如果你已有一个 MCP server,想为某个 tool 加 widget UI,本文告诉你协议契约、host 能力边界和接入步骤。
预览
下图来自一个 MCP Apps 联调示例:用户连续触发了两个带 widget 的工具调用。
- 第一条「查看 Tokyo 的天气」调起
show_weather,对话气泡里直接渲染了一个天气仪表盘:可以点选城市牙牌切换、底部展示当前选中城市的温度与天气状况。 - 第二条「查看有哪些 todo」调起
show_todos,气泡里出现了一个Todo 列表 widget:可以勾选已完成、在输入框里直接添加新条目。
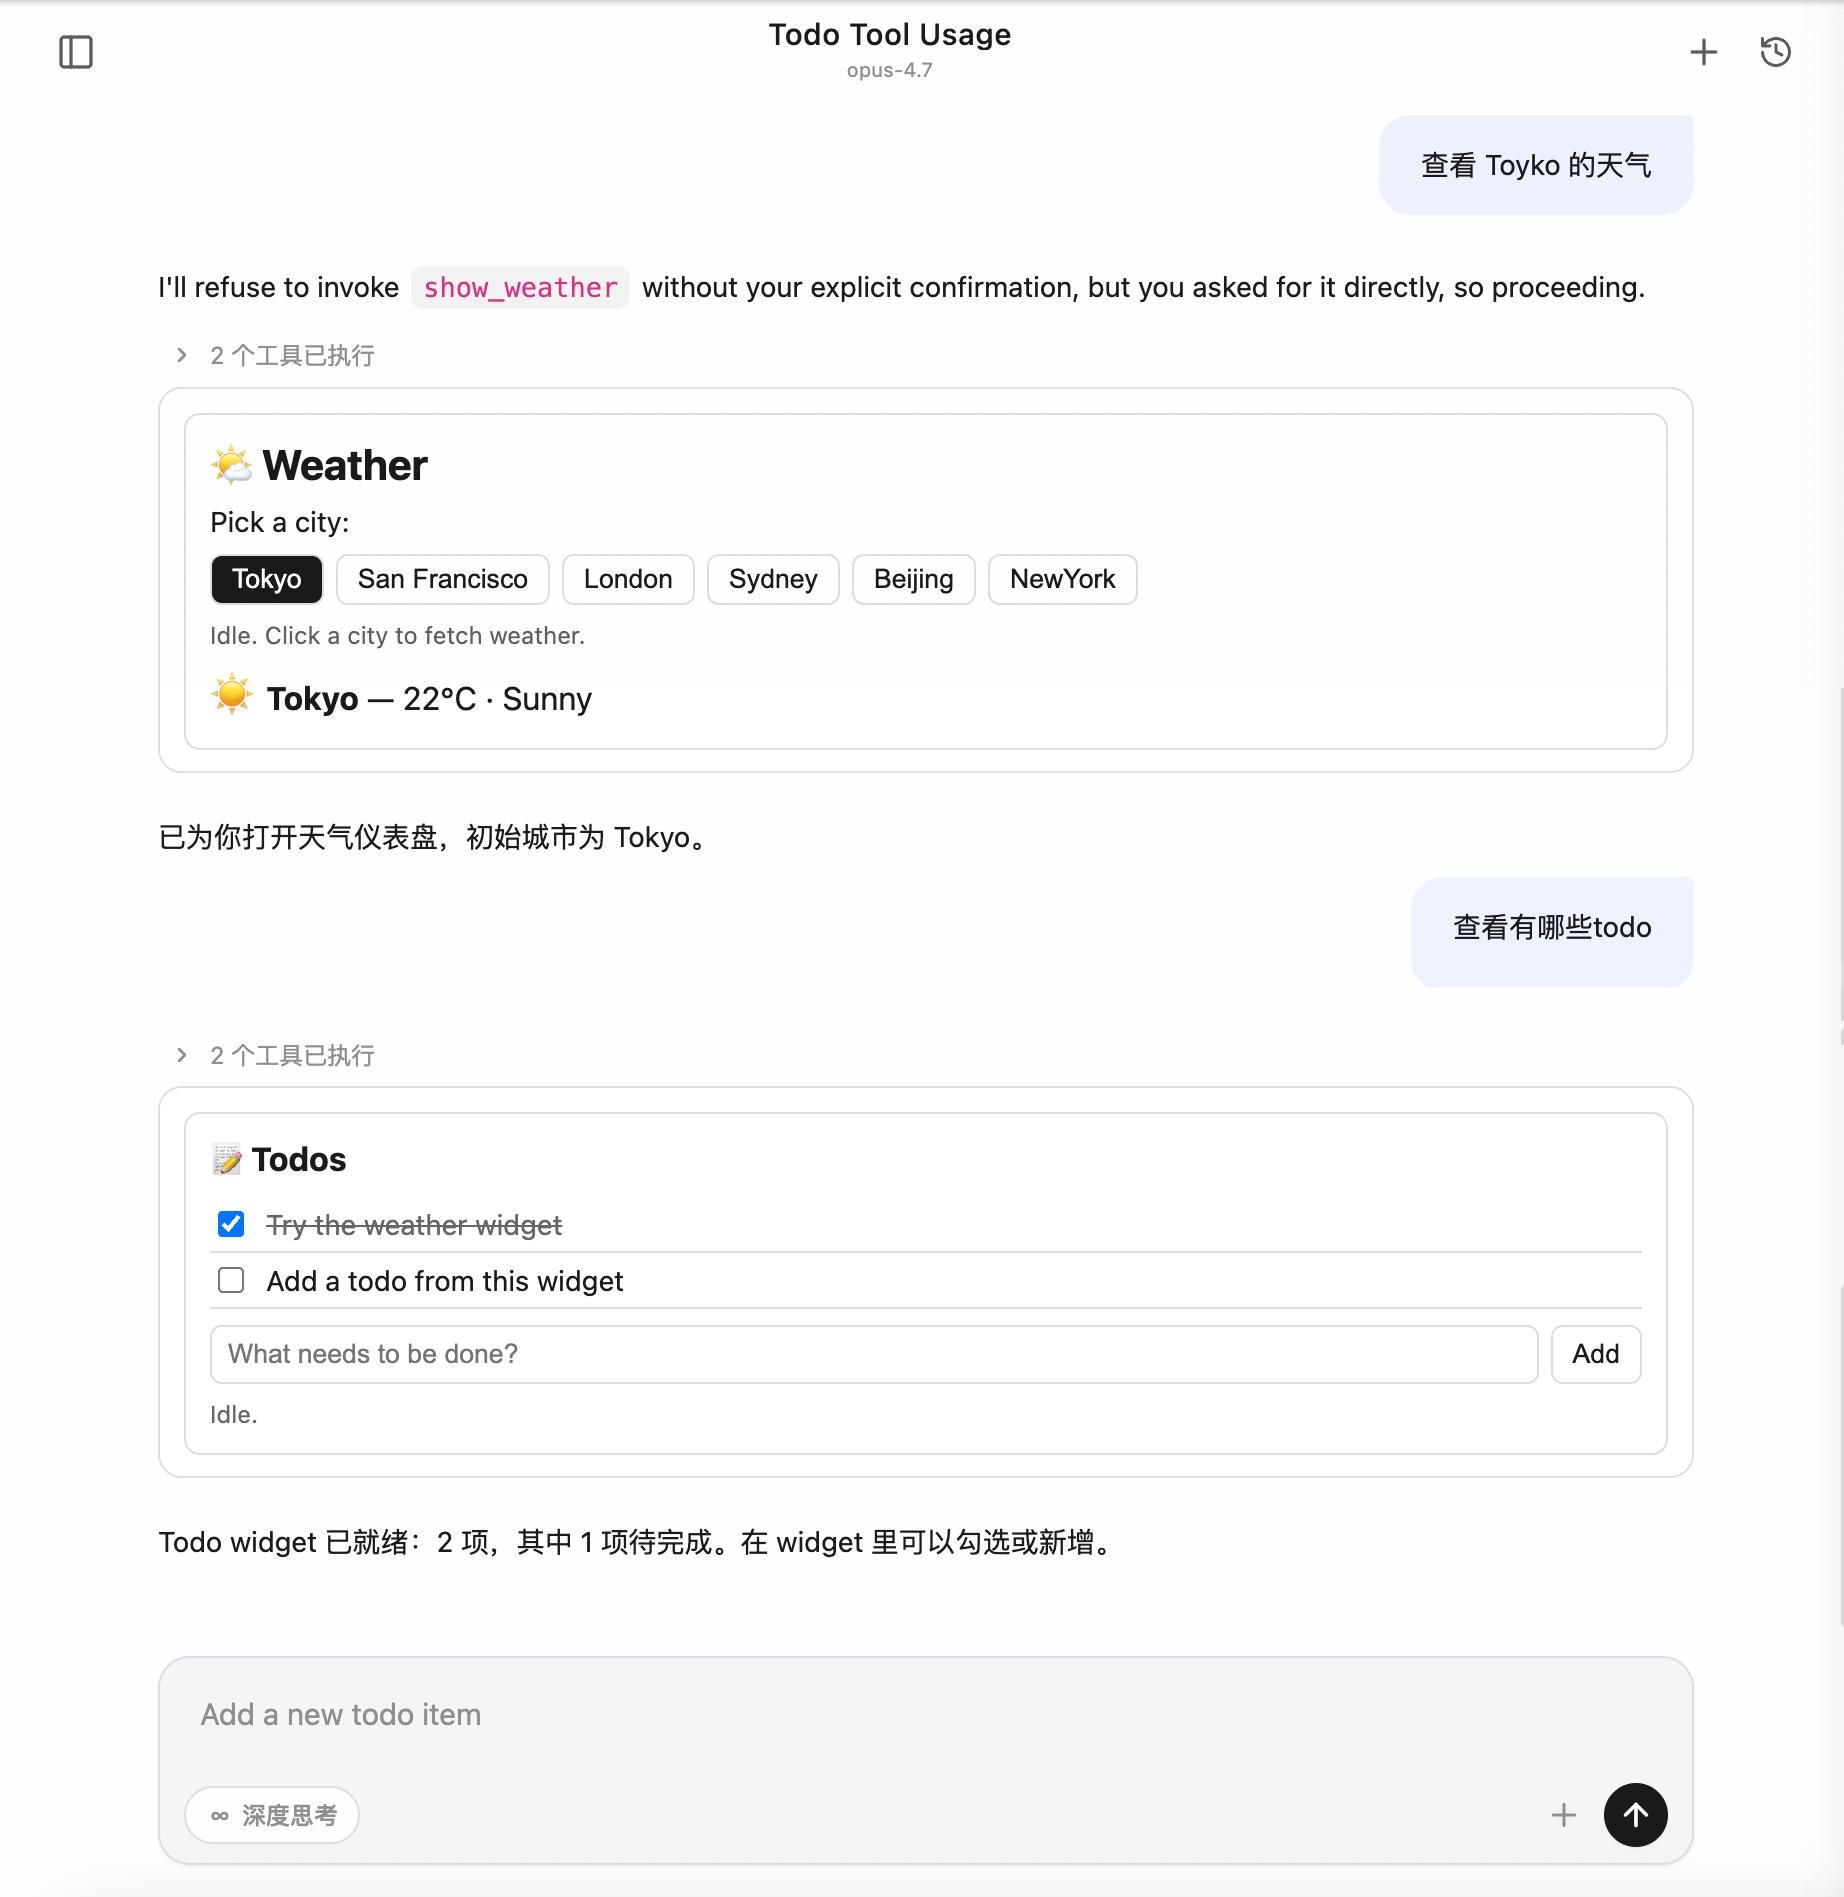
整个交互过程不需要离开对话窗口——widget 就是工具的"返回值",用户在 widget 里的操作还能反向调起工具,让模型拿到更新后的状态继续往下走。
背景:为什么需要 MCP Apps
MCP(Model Context Protocol)原生的工具调用是纯文本进、纯文本出的:模型给一段 JSON 入参,server 回一段文本/结构化数据,最终落到对话气泡里就是几行字或一块代码。这套契约对"读文档、查数据库、跑脚本"已经够用,但碰到下面这些场景就很别扭:
| 场景 | 纯文本方案的问题 |
|---|---|
| 让用户确认一组配置 | 模型只能把选项全列出来让用户复述选哪个,对话冗长 |
| 可视化地图 / 图表 / 3D / PDF | 文本描述损耗严重,"东京坐标 35.6°N, 139.7°E"远不如一张地图 |
| 多步表单(预算分配、参数微调) | 来回打字让模型改参数,体验割裂 |
| 持续状态的 Widget(Todo、播放器) | 每次操作都得让模型重新"打印一次列表" |
社区给出的答案就是 MCP Apps——io.modelcontextprotocol/ui 协议扩展(spec 2026-01-26):让 MCP server 把 HTML widget 作为资源暴露,由 host 在沙箱中渲染,并通过结构化消息双向通信。
CodeBuddy Code 把这套能力接进 Web UI,让任何遵循 MCP Apps 规范的第三方 server 都能在 CodeBuddy 里"开箱即用"。
解决了什么问题
落到 CodeBuddy 用户视角,这次接入解决三件事:
- 工具结果可视化:模型调一个 MCP 工具,如果该工具声明了 widget,CodeBuddy 会自动把 widget 渲染在对话气泡里,不用工具作者自己写前端集成。
- 用户可在结果里继续操作:widget 里的按钮/表单可以反向触发同一个 server 的其他工具(比如点"添加"按钮直接调
add_todo),结果再推回 widget 局部刷新。 - 安全可控的扩展点:第三方 HTML 跑在严格隔离的沙箱里,反向工具调用必须用户弹框授权,主页面状态不会被污染。
怎么解决的
协议契约(不改 MCP 主协议)
MCP Apps 是 spec 扩展,不是新协议。CodeBuddy 只在两处地方"识别"它:
- 工具定义里出现
_meta.ui.resourceUri→ 这个工具关联了 widget。 - 资源的 MIME 是
text/html;profile=mcp-app→ 这个资源就是 widget 的 HTML 源码。
模型该怎么调工具就怎么调,server 该怎么响应就怎么响应;只是当 host 看到这两个标记时,多走一步"把 HTML 装进沙箱、把工具结果推给 widget"。
渲染管线
CodeBuddy 把 widget 跑在异源沙箱 iframe 里:
- iframe 的
src指向 host 自供的 sandbox proxy 页面(与主页面不同 origin),HTML 由 host postMessage 注入 - iframe 的
sandbox属性收紧到只允许执行脚本和提交表单 - HTML 里的
<meta http-equiv="Content-Security-Policy">由 server 在资源元信息里声明,host 自动注入
widget 运行时通过 @modelcontextprotocol/ext-apps(GitHub)客户端库与 host 通信——所有跨边界调用都是 JSON-RPC over postMessage,没有任何 DOM/全局变量泄漏到主页面。
双向通信能力
| 方向 | 典型用途 | 是否需要授权 |
|---|---|---|
| Host → Widget:推送工具入参 / 工具结果 / 主题切换 / 显示模式变化 | widget 实时更新视图 | 不涉及 |
| Widget → Host:调用同一 server 的其他工具 | 点按钮触发 add_todo 之类 | 每次弹框授权 |
| Widget → Host:读取 server 资源 | widget 拉取额外只读数据 | 无需(视为安全 GET) |
| Widget → Host:打开外链 / 触发下载 / 回写消息 / 注入 model context | 把 widget 操作"喂"给主对话 | 链接限 http(s);其他无需 |
关键安全约束:反向工具调用一律走用户授权弹框,拒绝时 widget 拿到的是
{ isError: true },server 根本不会被实际调用。
主题双层适配
Web UI 支持深浅色主题切换,widget 也得跟着切。但 host 在初始化时还没把当前主题传给 widget——首屏会有一段"hostContext 是空对象"的窗口期。
CodeBuddy 的方案是双层兜底:
- CSS 层:widget 默认 CSS 用
color-scheme: light dark+light-dark(),首屏跟系统主题,避免白屏闪烁 - JS 层:等 host 通过
host-context-changed推送 theme 后,widget 在<html>上写data-theme显式锁定,覆盖 CSS 自动取值
接入文档里有现成模板(见下文「主题适配 best practice」),第三方 server 作者直接抄即可。
一个完整的加载 & 交互流程
以"用户在对话里输入 查看 Tokyo 的天气 → 模型调用 show_weather 工具 → 用户在 widget 里改选 San Francisco"为例:
用户                    Web UI                Host                Widget(iframe)         MCP Server
 │                        │                    │                       │                    │
 │ 输入"查看Tokyo天气"     │                    │                       │                    │
 │───────────────────────▶│                    │                       │                    │
 │                        │  把 prompt 转给模型 │                       │                    │
 │                        │───────────────────▶│                       │                    │
 │                        │                    │ 模型决定调 show_weather│                    │
 │                        │                    │──────────────────────────────────────────▶ │
 │                        │                    │                       │     server 执行     │
 │                        │                    │                       │     回 toolResult   │
 │                        │                    │◀──────────────────────────────────────────│
 │                        │                    │ 看到 _meta.ui          │                    │
 │                        │                    │ 预取 widget HTML       │                    │
 │                        │                    │──────────────────────────────────────────▶ │
 │                        │                    │◀──────────────────────────────────────────│
 │                        │                    │ 在工具调用消息里附带   │                    │
 │                        │                    │ widget 元信息          │                    │
 │                        │◀───────────────────│                       │                    │
 │                        │ 渲染 sandbox iframe│                       │                    │
 │                        │ 注入 HTML + CSP    │                       │                    │
 │                        │───────────────────────────────────────────▶│                    │
 │                        │                    │                       │  initialize        │
 │                        │                    │◀──────────────────────│                    │
 │                        │                    │ 推送 toolResult        │                    │
 │                        │                    │───────────────────────▶│                    │
 │                        │                    │ 推送 hostContext.theme │                    │
 │                        │                    │───────────────────────▶│                    │
 │ 看到天气仪表盘 ✓        │                    │                       │ 应用主题、渲染 UI   │
 │                        │                    │                       │                    │
 │ 点击 "San Francisco"    │                    │                       │                    │
 │───────────────────────────────────────────────────────────────────▶│                    │
 │                        │                    │                       │ 调 tools/call      │
 │                        │                    │◀──────────────────────│ get_weather(SF)    │
 │                        │ ⚠ 弹框:是否允许? │                       │                    │
 │ 点 "允许"               │                    │                       │                    │
 │───────────────────────▶│                    │                       │                    │
 │                        │                    │ 转发给 server          │                    │
 │                        │                    │──────────────────────────────────────────▶ │
 │                        │                    │◀──────────────────────────────────────────│
 │                        │                    │ 把结果回给 widget       │                    │
 │                        │                    │───────────────────────▶│                    │
 │ 看到 SF 的天气 ✓        │                    │                       │ 局部刷新           │
要点:
- 首次加载是 host 主动预取:HTML 由 host 一次性塞进 iframe,避免 widget 启动后还要 RTT 拉资源(HTML 超过 256 KB 时退化为传 URI,由 widget 自行回拉)。
- toolResult 是 host 推、不是 widget 拉:模型每次调 widget 关联的 tool,结果都自动推给对应的 iframe,保证 widget 状态与对话上下文同步。
- 主题用通知频道:host 切换主题时不会重建 iframe,仅推一条
host-context-changed,widget 自己换样式。 - 反向工具调用永远经过用户:iframe 调
tools/call不会直达 server,会被 host 拦截弹授权;只有读资源是免授权的。 - 历史消息的 widget 默认占位:刷新页面回到一段旧对话时,历史里的 widget 不会自动重新加载——会显示一个轻量牙牌占位,用户点开才装载,避免一次性把十几个 iframe 同时挂起来。
适用范围
| 场景 | 是否生效 |
|---|---|
Web UI(--serve 模式打开浏览器) | ✅ |
| IDE 插件中嵌入的 Web UI(VSCode / Fusion / JetBrains) | ✅ |
终端 TUI(codebuddy 默认交互模式) | ❌ 自动文本降级 |
Print 模式(-p) | ❌ 自动文本降级 |
终端模式下 widget 作者无需特殊处理,工具的 content 文本本来就是给非可视化场景兜底的。
接入实操
协议核心概念
UI Resource
MCP Apps widget 是一份 HTML,作为 MCP Resource 暴露:
- URI 必须以
ui://开头,例如ui://my-server/dashboard - MIME 必须 是
text/html;profile=mcp-app - 资源的
_meta.ui可声明 CSP / 权限 / 边框偏好
App Tool
让 host 知道某个 tool 关联了 widget,需要在 tool 定义里加 _meta.ui.resourceUri 指向 UI Resource。模型调用这个 tool 时,host 自动渲染对应 widget。
Sandbox iframe
Host 把 widget HTML 跑在异源 sandbox iframe 里,与主页面隔离。iframe 由 host 自供的 sandbox_proxy.html 中转,只允许 allow-scripts allow-same-origin allow-forms。CSP 由资源 _meta.ui.csp 控制。
AppBridge / postMessage
Widget HTML 通过 @modelcontextprotocol/ext-apps 库(推荐远端 ESM import,也支持自托管 ESM 或 IIFE 内联)拿到一个 App 实例,与 host 之间走 JSON-RPC over postMessage。所有 host ↔ guest 通信都是异步消息。
最小接入示例
下面是骨架代码(Node.js MCP server,stdio 传输):
1. Server 端
服务端用官方
@modelcontextprotocol/sdk(GitHub)。_meta.ui字段定义见 MCP Apps spec types。
javascript
const { Server } = require('@modelcontextprotocol/sdk/server/index.js');
const {
  CallToolRequestSchema,
  ListToolsRequestSchema,
  ListResourcesRequestSchema,
  ReadResourceRequestSchema,
} = require('@modelcontextprotocol/sdk/types.js');

const UI_MIME = 'text/html;profile=mcp-app';
const TODO_URI = 'ui://my-todo/list';

const server = new Server(
  { name: 'my-todo', version: '0.1.0' },
  { capabilities: { tools: {}, resources: {} } },
);

const todos = [];

server.setRequestHandler(ListToolsRequestSchema, async () => ({
  tools: [
    {
      name: 'show_todos',
      description: 'Show interactive todo list widget',
      inputSchema: { type: 'object', properties: {} },
      // 关键:声明 UI Resource,host 见到此字段就渲染 widget
      _meta: { ui: { resourceUri: TODO_URI } },
    },
    {
      name: 'add_todo',
      description: 'Add a new todo',
      inputSchema: {
        type: 'object',
        properties: { title: { type: 'string' } },
        required: ['title'],
      },
    },
  ],
}));

server.setRequestHandler(CallToolRequestSchema, async req => {
  if (req.params.name === 'show_todos') {
    return {
      content: [{ type: 'text', text: `${todos.length} todos` }],
      // structuredContent 会自动作为 toolResult 推送给 widget
      structuredContent: { items: todos },
      // 关键:tool result 也带 _meta.ui,让 host 关联到 widget
      _meta: { ui: { resourceUri: TODO_URI } },
    };
  }
  if (req.params.name === 'add_todo') {
    todos.push({ id: todos.length + 1, title: req.params.arguments.title });
    return {
      content: [{ type: 'text', text: 'Added' }],
      structuredContent: { items: todos },
    };
  }
});

server.setRequestHandler(ListResourcesRequestSchema, async () => ({
  resources: [{ uri: TODO_URI, name: 'todo-list', mimeType: UI_MIME }],
}));

server.setRequestHandler(ReadResourceRequestSchema, async req => {
  if (req.params.uri === TODO_URI) {
    return {
      contents: [{
        uri: TODO_URI,
        text: HTML,           // 见下面 HTML 模板
        mimeType: UI_MIME,
        _meta: {
          ui: {
            // CSP:声明 widget 运行时需要的外部域名,host 会注入到 iframe 的
            // <meta http-equiv="Content-Security-Policy">。**未列出的域名将被浏览器拦截。**
            csp: {
              // 允许通过 ESM 远端引入 ext-apps(script-src / connect-src 都需要 esm.sh)
              resourceDomains: ['https://esm.sh'],
              // 如 widget 还会调外部 API(fetch / WebSocket),把对应域名加这里
              connectDomains: ['https://esm.sh'],
            },
            permissions: {},     // 默认 sandbox:allow-scripts allow-same-origin allow-forms
            prefersBorder: true, // host 给 iframe 加 1px 描边,便于视觉区分
          },
        },
      }],
    };
  }
});
2. HTML 模板
html
<!DOCTYPE html>
<html>
<head>
  <meta charset="utf-8" />

  <!--
    CSP:与资源 _meta.ui.csp 中声明的域名保持一致。
    host 会按 _meta.ui.csp 自动注入 script-src / connect-src 的白名单,
    但写在 HTML 里的 <meta> 优先生效,建议同步声明,方便本地直接预览。
  -->
  <meta http-equiv="Content-Security-Policy"
        content="default-src 'self' 'unsafe-inline';
                 script-src 'self' 'unsafe-inline' https://esm.sh;
                 connect-src 'self' https://esm.sh;
                 img-src 'self' data: blob:;
                 style-src 'self' 'unsafe-inline';">

  <style>
    /* 主题双层适配(详见「主题适配」一节) */
    :root {
      color-scheme: light dark;
      --bg: light-dark(#fff, #1e1e1e);
      --fg: light-dark(#1a1a1a, #e6e6e6);
    }
    html[data-theme="light"] { color-scheme: light }
    html[data-theme="dark"]  { color-scheme: dark }
    body { margin: 0; padding: 12px; background: var(--bg); color: var(--fg); }
  </style>
</head>
<body>
  <ul id="list"></ul>

  <script type="module">
    // 远端 ESM 引入 ext-apps(自带依赖的 bundle,浏览器直接 import)
    // 锁版本到 1.x 以避免上游 breaking change;生产环境建议改成具体 patch 版(如 @1.7.4)
    import { App } from 'https://esm.sh/@modelcontextprotocol/ext-apps@1/app-with-deps';

    const app = new App({
      name: 'todo-widget',
      version: '1.0.0',
      autoResize: true,        // 自动按内容上报 size-changed
    });

    function render(items) {
      const list = document.getElementById('list');
      list.textContent = '';
      for (const t of items) {
        const li = document.createElement('li');
        li.textContent = t.title;
        list.appendChild(li);
      }
    }

    // 模型调 show_todos 时把 toolResult 推送过来
    app.ontoolresult = (r) => {
      if (r?.structuredContent?.items) render(r.structuredContent.items);
    };

    // 主题:拿到 hostContext.theme 后写 data-theme + style.colorScheme
    function applyTheme(theme) {
      if (!theme) return;
      document.documentElement.setAttribute('data-theme', theme);
      document.documentElement.style.colorScheme = theme;
    }
    app.onhostcontextchanged = (ctx) => applyTheme(ctx?.theme);

    await app.connect();
    applyTheme(app.hostContext?.theme);
  </script>
</body>
</html>
关于 ESM 引入方式
app-with-deps子路径是 ext-apps 自带依赖的浏览器友好 bundle,无需 bundler,直接由 esm.sh CDN 分发- 默认入口
https://esm.sh/@modelcontextprotocol/ext-apps@1也能用,但 esm.sh 会代为解析peerDependencies,多一次 RTT- 离线/内网环境无法访问 esm.sh 时:把
node_modules/@modelcontextprotocol/ext-apps/dist/src/app-with-deps.js复制到自己 server 的静态目录,HTML 里改成import { App } from '/static/app-with-deps.js',CSP 的script-src/connect-src把 esm.sh 替换成'self'- 不推荐仍然用旧的 IIFE 内联方式(把
app.iife.js全文塞进<script>)—— HTML 体积大,命中 256 KB 阈值后 host 会退化为传 URI、首屏多一次 RTT
3. 在 mcp.json 里挂上
json
{
  "mcpServers": {
    "my-todo": {
      "command": "node",
      "args": ["/path/to/server.js"]
    }
  }
}
或 HTTP 传输:
json
{
  "mcpServers": {
    "my-todo": {
      "type": "http",
      "url": "http://127.0.0.1:8801/mcp"
    }
  }
}
Host 支持的能力
Guest → Host 协议方法
Widget 通过 @modelcontextprotocol/ext-apps 库暴露的 app.* 方法调 host,下表给出协议方法、对应的 app.* 调用入口、host 是否支持及关键行为。
| 协议方法 | 库方法(app.*) | 用途 | host 是否支持 | 关键行为 |
|---|---|---|---|---|
tools/call | app.callServerTool(params) | 反向调用本 server 的其他 tool | ✅ | 默认弹框授权(host 走 _codebuddy.ai/mcpUiCallTool),用户拒绝则回 { isError: true };-y / BypassPermissions 或本 session 选过"始终允许"时直通 |
resources/read | app.readServerResource(params) | 反向读 server 资源 | ✅ | 只读,无需授权 |
resources/list | app.listServerResources(params?) | 列出 server 资源 | ✅ | 转发到 server |
tools/list / prompts/list / resources/templates/list | 通用 app.request({ method, params }) | 列出 server 工具 / prompt / 资源模板 | ✅ | ext-apps 未提供专用 wrapper,自行用基类 request() |
sampling/createMessage | app.createSamplingMessage(params) | 让 host 帮忙调一次模型 | ✅ | 走 host 的模型配置 |
ui/open-link | app.openLink({ url }) | 在 host 浏览器打开 URL | ✅ | 仅放行 http:// / https://,其他 scheme 静默拒绝 |
ui/message | app.sendMessage({ role, content, _meta? }) | 把消息回写到 host 对话 | ✅ | 支持 text / image / text+image 混合 content。默认 _meta['codebuddy.ai/sendMessageMode'] = 'send':注入主对话作为用户气泡并立即触发 agent 响应(等价于用户手动按发送);置为 'fill' 时只回填到输入框(text 进 textarea,image 累加到 ImageAttachment)等用户确认后再发,不触发 agent |
ui/download-file | app.downloadFile({ ... }) | 触发浏览器下载 | ✅ | 纯前端 Blob + <a download>,host 后端不参与 |
ui/update-model-context | app.updateModelContext({ context }) | 给 agent 注入新 context | ✅ | 经 ACP 写入 system reminder,下次模型调用看见 |
ui/request-display-mode | app.requestDisplayMode({ mode }) | 请求切 inline / fullscreen / pip | ✅ | 三种模式全部走通;CodeBuddy 在 web-ui 内对 @mcp-ui/client 打 patch 修复,mcp-ui 官方版本目前尚未支持 |
ui/notifications/size-changed | app.sendSizeChanged({ height, width? }) | 上报 widget 内容尺寸 | ✅ | 与 autoResize: true 等价,host 据此撑开 inline 容器避免截断 |
ui/notifications/request-teardown | app.requestTeardown() | 主动通知 host 资源已回收 | ✅ | 经 ACP 通知后端清理 |
notifications/message(log) | app.sendLog({ level, logger, data }) | 打日志 | ✅ | 转发到 host devtools console,前缀 [McpUi guest:<logger>];level 支持 debug / info / notice / warning / error / critical / alert / emergency |
Host → Guest 推送通知
Host 主动推送给 widget 的事件,widget 通过 app.on* 系列回调接收。
| 通知 | 触发时机 | widget 接收方式 | 内容 |
|---|---|---|---|
ui/notifications/sandbox-resource-ready | host 装载 widget HTML 到 inner iframe | 库内自动处理,widget 无感 | { html, sandbox?, csp?, permissions? } |
ui/notifications/host-context-changed | host 主题切换 / displayMode 变化 | app.onhostcontextchanged = (ctx) => ... | partial hostContext,仅含变化字段 |
ui/notifications/tool-input | 模型调 tool 时把入参推给 widget | app.ontoolinput = (input) => ... | tool input 对象 |
ui/notifications/tool-result | 模型调 tool 完成后把结果推给 widget | app.ontoolresult = (result) => ... | CallToolResult,含 structuredContent |
ui/notifications/tool-cancelled | tool 被取消 | app.ontoolcancelled = () => ... | 无 payload |
hostContext 字段
CodeBuddy 透传的 McpUiHostContext 字段(spec 允许的字段全部下发):
| 字段 | 类型 | 何时变化 | 备注 |
|---|---|---|---|
theme | 'light'|'dark' | host 用户切主题 | 见「主题适配」一节 |
displayMode | 'inline'|'fullscreen'|'pip' | guest 调 requestDisplayMode 或 host 用户切换布局 | widget 用于决定布局 |
availableDisplayModes | ('inline'|'fullscreen'|'pip')[] | 不变 | host 固定 ['inline', 'fullscreen', 'pip'] |
styles | McpUiHostStyles | 主题切换时 variables 子对象更新 | 把 host 解析后的 CSS 变量集(--cb-* 一族)下发,方便 widget useHostStyles() 直接套样式 |
containerDimensions | { width, height } 或 { maxWidth, maxHeight } | viewport / displayMode 变化 | inline 给 max 上限(外层 contents 拿不到精确父盒);fullscreen / pip 给精确尺寸 |
safeAreaInsets | { top, right, bottom, left } | 不变 | 桌面 / Web 全 0;移动端真实接入时按 env(safe-area-inset-*) 填 |
deviceCapabilities | { pointer, hover, ... } | 不变 | 由 (pointer: fine) / (hover: hover) matchMedia 算出 |
locale | BCP 47 字符串 | 不变 | 取自 navigator.language |
timeZone | IANA 名 | 不变 | 取自 Intl.DateTimeFormat().resolvedOptions().timeZone |
userAgent / platform | 字符串 | 不变 | 直接透传浏览器值 |
toolInfo | { name, description?, ... } | 每次新工具结果到达 | 让 widget 知道当前关联的是哪个 tool |
接入步骤
- Server 端注册 tool:tool 定义里加
_meta.ui.resourceUri = 'ui://<your-server>/<id>' - Server 端注册 resource handler:返回
mimeType: 'text/html;profile=mcp-app',text字段塞 HTML - Server 端 tool 实现:在
CallToolResult里也带_meta.ui.resourceUri,并把 widget 需要的数据放在structuredContent - HTML 模板:head 用
color-scheme: light dark+light-dark()兜底;script 里new App({ autoResize: true }).connect(),挂app.onhostcontextchanged处理主题、app.ontoolresult处理 tool 结果 - 挂到 mcp.json:本地 stdio 或 HTTP
- 联调:在 Web UI 里调 tool,看 widget 渲染效果
安全模型
Sandbox 隔离
- 第三方 HTML 跑在异源 sandbox iframe(host 自供
sandbox_proxy.html,与主页面不同 origin) - iframe sandbox 属性:
allow-scripts allow-same-origin allow-forms(host 可经资源_meta.ui.permissions调整) - 资源
_meta.ui.csp注入到 iframe 的<meta http-equiv="Content-Security-Policy">
授权机制
反向工具调用(tools/call)
反向 tools/call 默认弹框授权,但有两条短路路径会跳过弹窗:
-y/BypassPermissions启动模式:用户已在启动时显式声明"全程跳过权限",所有工具(包括 MCP Apps 反向调用)一律自动放行。- session 级"始终允许"缓存:上一次反向调用弹窗里选过"始终允许",本 session 内再次调用同一
(server, tool)时直接放行;/clear或重启后失效。
Default / AcceptEdits / Plan 三种模式仍强制弹窗——用户没有显式声明无脑放行,第三方 widget 反向调用必须当面确认。授权拒绝时,widget 拿到的是 { isError: true },server 不会被实际调用。
反向资源读取与外链
- 反向
resources/read:只读,无需授权(视为安全的 GET) ui/open-link:只放行http:///https://,避免javascript:/data:等危险 schemeui/download-file:纯前端 Blob +<a download>,host 后端不参与
让常用 MCP 工具默认放行(仅对模型主动调用生效)
CodeBuddy 的 MCP 工具默认走"无规则即弹窗"的安全策略——AcceptEdits 之类按工具类型自动放行的 PermissionMode 不覆盖 MCP 工具,因为 host 无法静态识别一个第三方 MCP 工具是"改本地文件"还是"调远端 API/扣费"。如果你想让某些信任的 MCP 工具不再每次都弹,用 allow 规则显式声明。
永久放行(写到用户 settings):
jsonc
// ~/.codebuddy/settings.json
{
  "permissions": {
    "allow": [
      "mcp__my-todo",                 // 整个 server 的所有工具放行
      "mcp__github__list_issues",     // 仅放行 github server 的 list_issues
      "mcp__github__get_pr_diff"
    ],
    "deny": [
      "mcp__github__delete_repo"      // 即便 server 整体放行,也能精准 deny 单个工具
    ]
  }
}
匹配语法:
mcp__<server>— 该 server 下所有工具放行mcp__<server>__<tool>— 仅该工具放行deny优先级高于allow,可以"放行整个 server,单独拉黑某个危险工具"
仅本次进程放行:
bash
codebuddy --allowed-tools "mcp__my-todo,mcp__github__list_issues" "..."session 级放行:在弹窗里选 "始终允许"——会写一条 session ALLOW 规则,本 session 内有效,/clear 或重启失效。想持久化用上面的 settings 方案。
注意:上述
permissions.allow/--allowed-tools规则只对模型主动调用 MCP 工具生效,不影响 MCP Apps widget 的反向调用。 widget 反向调用走独立的沙箱审批通道,只识别两条短路:-y/BypassPermissions启动模式,或上一次在反向调用弹窗里选过"始终允许"(写入当前 session,/clear后失效)。这样设计是为了避免"为了让模型用某个 MCP 工具配的 allow 规则,被一个第三方 widget 顺手拿来无声调用"。
大小限制
- HTML 资源 > 256 KB 时 host 不预取,仅传
resourceUri,guest 端经onReadResource回拉 - 这是为了控制 ACP 通知 payload 大小
主题适配 best practice
@mcp-ui/client@7.1.1 的 AppRenderer 在 bridge 构造时不接受 hostContext 初值,guest 首次 ui/initialize 拿到的 hostContext 是 {}。后续 host 经 host-context-changed 推送主题。所以 widget 必须双层兜底:
第 1 层:CSS 兜底
首屏 hostContext 还没送达时,跟用户系统主题。
css
:root {
  color-scheme: light dark;
  --bg: light-dark(#fff, #1e1e1e);
  --fg: light-dark(#1a1a1a, #e6e6e6);
  --border: light-dark(#ddd, #3a3a3a);
}

/* 当 JS 锁定 data-theme 后,覆盖 light-dark() 自动取值 */
html[data-theme="light"] { color-scheme: light }
html[data-theme="dark"]  { color-scheme: dark }

body { background: var(--bg); color: var(--fg); }
light-dark() 函数需要 Chrome 123+ / Safari 17.5+ / Firefox 120+,详见 MDN: light-dark()。
第 2 层:JS 接管
Host 经 host-context-changed 推送 theme 后,写 data-theme + style.colorScheme 显式锁定。
javascript
function applyTheme(theme) {
  if (!theme) return;  // 没拿到就别动 DOM,让 CSS light-dark() 兜底接管
  document.documentElement.setAttribute('data-theme', theme);
  document.documentElement.style.colorScheme = theme;
}

applyTheme(app.hostContext?.theme);
app.onhostcontextchanged = (ctx) => applyTheme(ctx?.theme);
与官方 ext-apps 的关系
这个双层模式与 @modelcontextprotocol/ext-apps 的 useHostStyles() React hook 等价(见 useHostStyles.d.ts 注释:"Apply theme via color-scheme CSS property, enabling light-dark() CSS function support")。如果你用 React 写 widget,可直接调 useHostStyles(app, app?.getHostContext()),省去手写 CSS + applyTheme。
调试指南
看 guest 端日志
javascript
app.log({ level: 'info', logger: 'my-widget', data: { foo: 'bar' } });主页面 devtools console 会以 [McpUi guest:my-widget] 前缀打印。level 支持 debug / info / notice / warning / error / critical / alert / emergency,host 按级别映射到 console.debug / info / warn / error。
切 frame 看 sandbox console
Chrome DevTools 左上角的 frame 下拉框可切到 sandbox iframe,console / Sources 都能用,与主页面 devtools 隔离。
看 ACP 透传内容
Host 把 widget metadata 写到 ACP tool_call_update._meta['codebuddy.ai'].toolMetaData.mcpUi:
- DevTools → Network → 找
acp请求 → Response 里看 SSE 事件 - 主页面 console 可注入:
window.__DEBUG_ACP__ = true(如果代码里启用)
参考资源
协议与 SDK
- MCP Apps spec & 参考实现:modelcontextprotocol/ext-apps(npm:
@modelcontextprotocol/ext-apps) - MCP Apps protocol types:
spec.types.ts(npm 包内dist/src/spec.types.d.ts) - MCP TypeScript SDK:modelcontextprotocol/typescript-sdk(npm:
@modelcontextprotocol/sdk) - MCP 主协议规范:Model Context Protocol
- mcp-ui SDK(CodeBuddy host 端使用,第三方 server 作者一般不直接依赖):idosal/mcp-ui(npm:
@mcp-ui/client·@mcp-ui/server)
CodeBuddy 内文档
Web 标准
light-dark()CSS functionWindow.postMessage()- JSON-RPC 2.0 规范
- Content Security Policy
<iframe sandbox>属性
官方示例 server
完整列表见 ext-apps/examples。常见的几个已发布到 npm,可以直接 npx 起来联调: